
Walnut Guitar
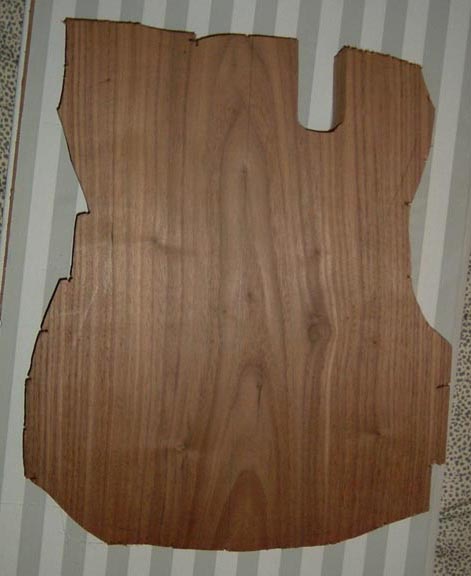
A buddy of mine just a gave me a slab of walnut that I can use to build my own guitar from. This thing is VERY heavy, very dense, very pretty. Kiln dried, and then it sat out in my buddys shop for about year. It was a left over from a table project that he did, for a customer that I set him up with. Good things do happen to those who do good things.
I think that I am going to use this for my "LesCaster" project. Two humbuckers, Bigsby, 2 vol/2 tone knobs, 3 way switch in the Les Paul location, Tele body style, neck and scale, tune-a-matic bridge. All gold hardware should be the way to go. I figure that it will be at least 6 months before I get to it. Clear high gloss, no tint or dyes on this stuff, at least for me.
One thing that I do know about this piece of wood is that it is 1/32" thin. I do not expect that to be a problem.
Plans for the Walnut guitar.
The body style, neck, and scale will be Telecaster. I know the sizes and scale involved, nothing to make up, create, etc. One less thing to FUBAR. Two humbuckers, models TBD. I want to use the Fishman tune-a-matic bridge w/Pizeo pickup in it. I am not sure about the number of controls now. 4 pots and 2 switches is a lot. I might do 1 volume and 2 tones, and a 3 way switch, plus the Fishman. What I would prefer to do is 1 volume, 1 tone. But this will all change. For the tail piece, a Bigsby B5.
The big issue for this guitar I think will be the weight. Untrimmed weight is 11.5lbs. I am going to rear route the controls, so that is an easy way to lose a bit of weight. The upper bout will prove challenging. What I am thinking is to use some of the left over pieces from the body shappping and to hollow out a cavity, and then cover it with a 1/4" piece of the left over. If I do it right, it will be very hard to tell. Then on the top drill some holes through, like I have seen on some accoustic guitars like the Ovations and Applause guitars. This will lower the weight and add an acoustic feel to it, plus make it really custom.
***********************************
22 Jan 03
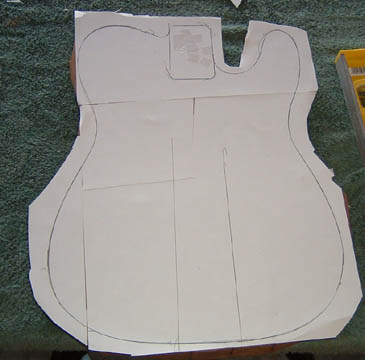
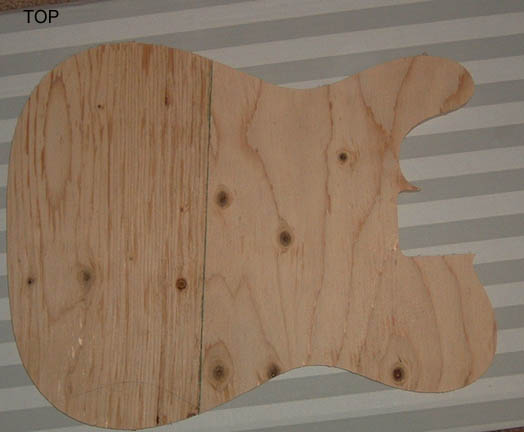
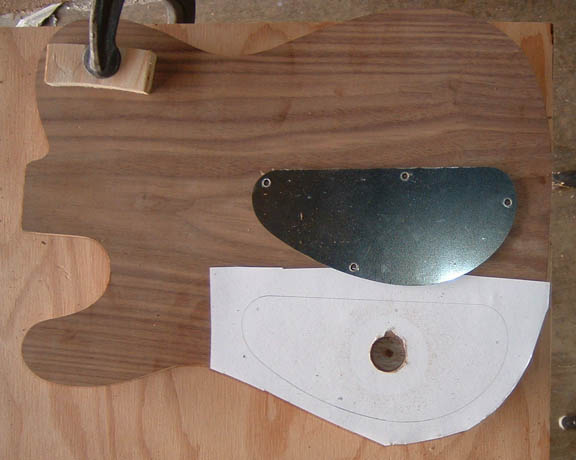
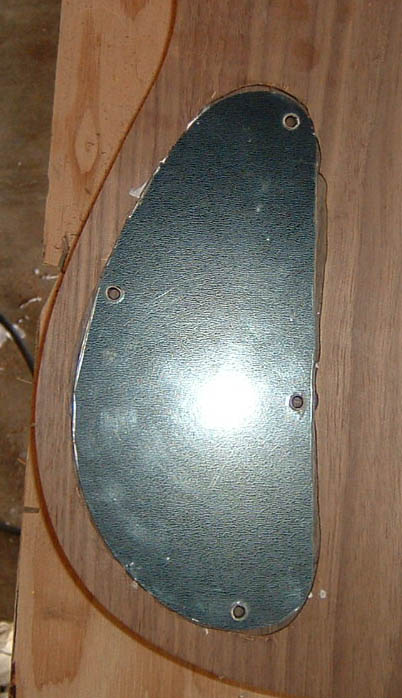
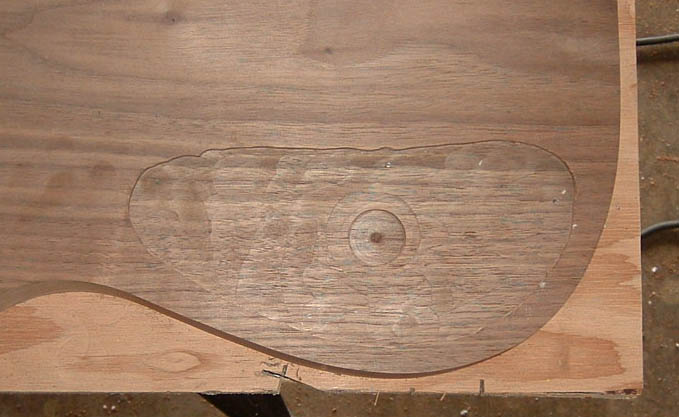
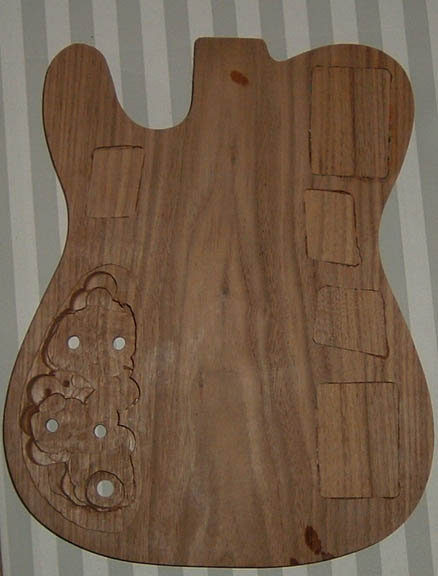
The first thing I had to do was pick the center line of the guitar, and then draw an outline of the guitar on the slab o' walnut. I chose to put the neck at what is the bottom of the photo above, centered on the "arrow" of the grain. Being a dark wood, the pencil outline does not stand out. In fact, it is kind of faint to the eye. I also measured the neck pocket on the Orange Guitar, and I will use that as my model. I also used the Orange Guitar for the outline.
Then, in a bit of arrogance, I decided that a full sized band saw was not needed. I could use my table top Ryobi saw. Nope. Nothing against the Ryobi, but it ain't big enough. I only had to waste one saw blade to see the error of my ways. So I need to call my buddy and see if I can use his band saw. But no harm done. I stayed well out side the lines. But I do need to get some pine boards that I can practive my routing on.
For the acoustic holes referenced above, I think that notes from a musical stave would be real slick. Maybe a treble clef, but I think that would be better as an inlay of some sort, likely wood. All skills I do not yet have.
*************************************
4 Mar 03
Making decisions and changing them, constantly. I have rethought some of what I want to do, and I think that I will use a Tele Humbucker bridge, string through. Still gold in color. For the PUPs, I am currently leaning real hard towards a Gibson Classic '57 and a P90 in the neck position.
I just discovered that the ES-135 does not have a P90, but rather a P100 from Gibson.
**************************************
7 Mar 03
The spinning continues. Maybe a std Tele bridge PUP and a P100 in the neck. Final decision time is a ways off still, so no hurry. I am sure I will change my mind again, someday.
Later in the evening. I talked with my luthier buddy, who has more experience than I do, and he set me on an HB in the bridge, and a P90 in the neck. And since he will be cleaning up any mess that I make, he does approve of the HB bridge available from Allparts.
I have been stressing over how this will come together, in terms of templates and tools, etc. And I think that I have a plan. I will get a template of both the top and back of a Tele, complete with cutouts for PUPs and all. Rout the neck pocket, and then the body outline. Then lay a sheet of white construction paper over it with double sticky tape, and mark the lines down from the neck pocket on the paper. Measure where the bridge line should be, and work from there.
****************************************
24 Mar 03
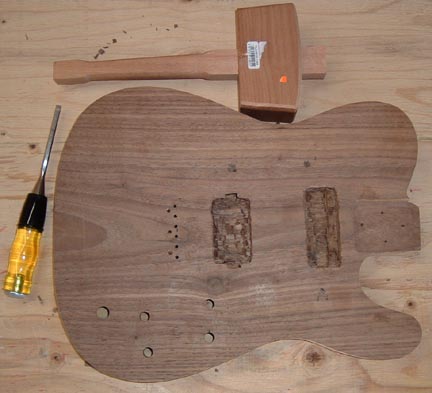
 I attacked the Walnut body today with my Jig saw and a long blade, as you can see.
It is a pretty crude cut, which is my intent. I stayed at least 1/4"
outside the line I have already drawn on it. And I have ordered a neck, Maple w/
Rosewood fingerboard. And a walnut skunk stripe. Seems to make sense to me.
The weight is now down to 6.5lbs, from 11.5lbs to start. 5lbs gone, just like
that. Wow.
I attacked the Walnut body today with my Jig saw and a long blade, as you can see.
It is a pretty crude cut, which is my intent. I stayed at least 1/4"
outside the line I have already drawn on it. And I have ordered a neck, Maple w/
Rosewood fingerboard. And a walnut skunk stripe. Seems to make sense to me.
The weight is now down to 6.5lbs, from 11.5lbs to start. 5lbs gone, just like
that. Wow.
If you look at the body VERY carefully you can see the pencil lines I used as my guide. I figured this would be OK as I did not intend to get real close to the outline.
***************************************
7 April, 2003
I now know one thing. I can not take a neck pup and arbitrarily put in the bridge position, and expect it to sound like a neck pup. Too little string action/movement to get the type of sound I want. So, what about skipping a bridge pup all together and going with a neck & middle pup. Would that give me the tone that I am looking for? Of course that generates its own list of questions, which I am trying to answer. The questions come down to:
****************************************
8 Apr, 2003
I have emailed with my luthier, and this is what it looks like will be happening. A P90 and a HB crammed up as close to the neck as they can go, and with a hard tail strat bridge. And no bridge PUP.
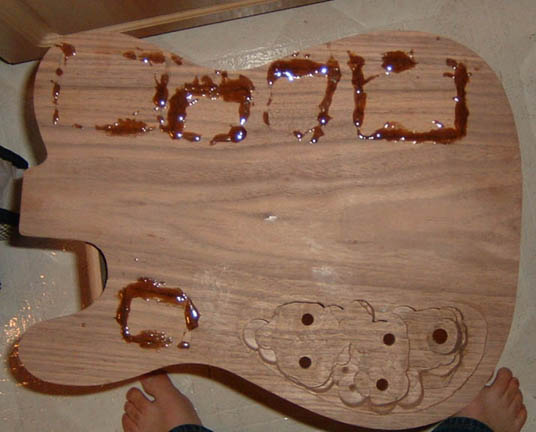
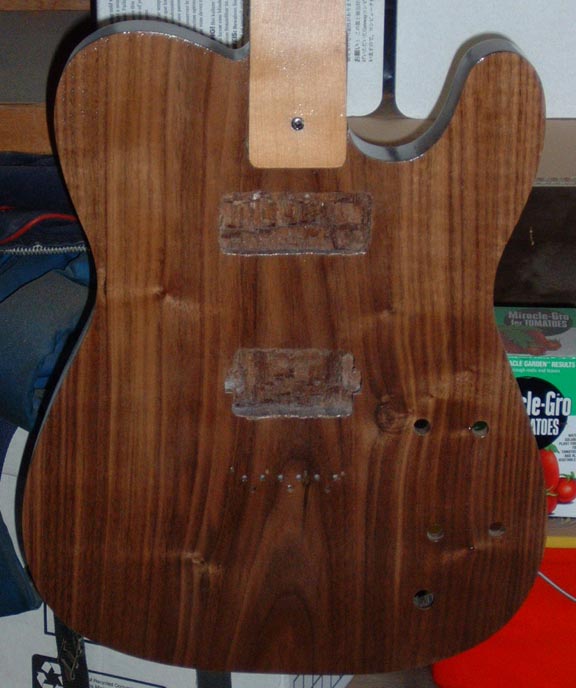
And I have done some work on the Walnut Guitar. Here it is. Lots of guts and a certain lack of brains, also known as impatience. But no harm to the body thus far.
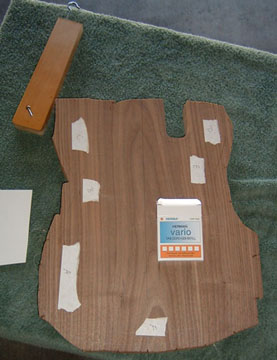 Some of the tools I used for this project. The box in the middle of the guitar
contains the double sticky sided tape that I used to hold the paper on (photo below).
The other pieces of tape are where I plan to lighten the body. I have already
cut some caps from the left over walnut bits that I excised when I rough cut the body.
Some of the tools I used for this project. The box in the middle of the guitar
contains the double sticky sided tape that I used to hold the paper on (photo below).
The other pieces of tape are where I plan to lighten the body. I have already
cut some caps from the left over walnut bits that I excised when I rough cut the body.
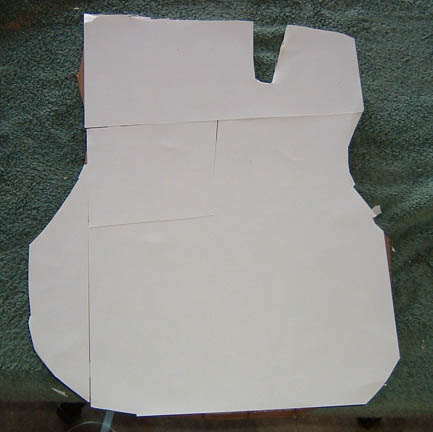 The white pieces of paper overlayed, and taped down from underneath.
 The outline of the guitar, from the top side of the guitar. If you look at
the pic above from 24 Mar. you can see why I laid down the white paper. I can see
the lines clearly.
The outline of the guitar, from the top side of the guitar. If you look at
the pic above from 24 Mar. you can see why I laid down the white paper. I can see
the lines clearly.
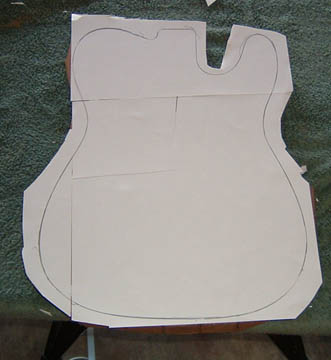
 I laid a straight edge along the neck stub that I used for my outline, and drew
these lines. Not sure why, but I suspect that they may come in handy when I need to
locate the bridge.
I laid a straight edge along the neck stub that I used for my outline, and drew
these lines. Not sure why, but I suspect that they may come in handy when I need to
locate the bridge.
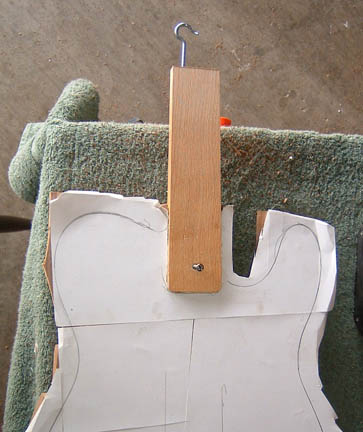
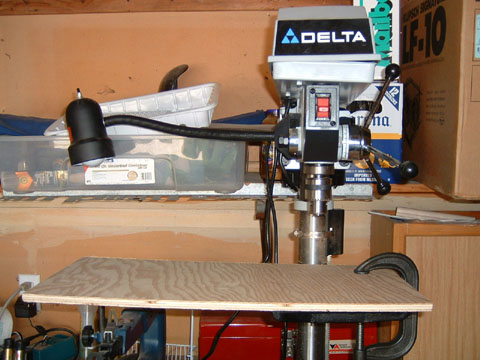 The first round of wood removal for the neck pocket was performed on my drill press
with a Forstner bit. The problem is that the drilling platform is not wide enough to
be stable with a slab of Walnut. So I did this instead. Instant stability.
The first round of wood removal for the neck pocket was performed on my drill press
with a Forstner bit. The problem is that the drilling platform is not wide enough to
be stable with a slab of Walnut. So I did this instead. Instant stability.
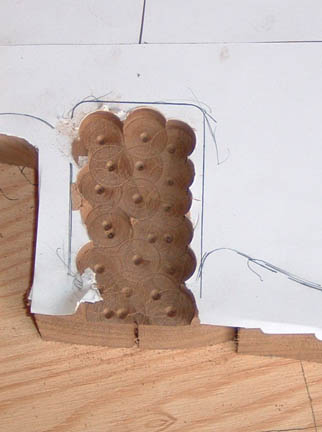 This is what the neck pocket looked like after the Forstner bit.
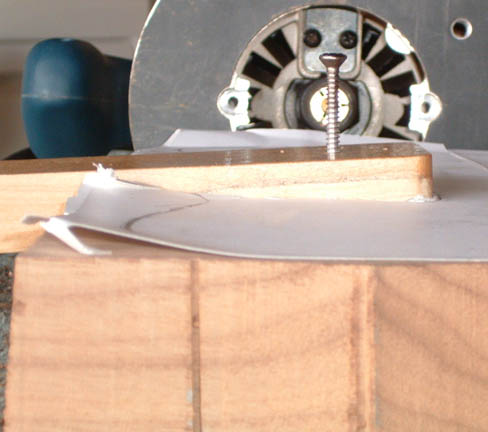
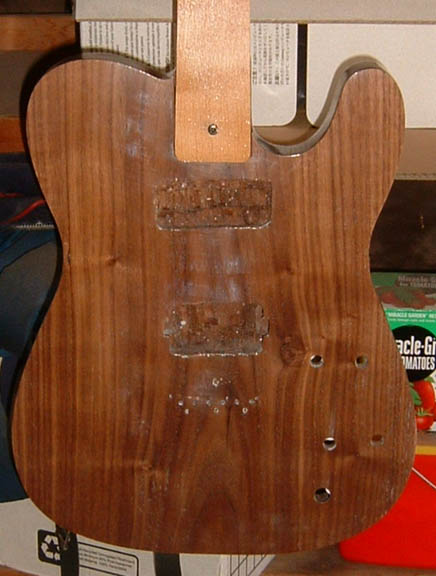
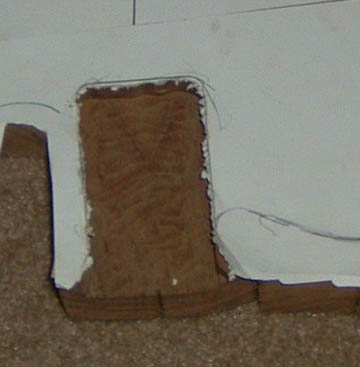 And this is what the neck pocket looked like after some routing. It is still
not wide enough, though it is almost deep enough. I am judging depth by the nitro
stains on the neck stub. I figured it was time to knock off and relax a bit and take
a shower before the wife gets home. Lets just say I smell a bit ripe at the moment.
And this is what the neck pocket looked like after some routing. It is still
not wide enough, though it is almost deep enough. I am judging depth by the nitro
stains on the neck stub. I figured it was time to knock off and relax a bit and take
a shower before the wife gets home. Lets just say I smell a bit ripe at the moment.
*******************************************************
9 Apr. 2003
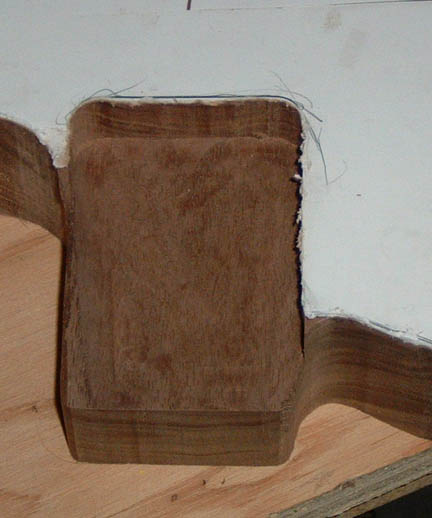
Well, I got the neck pocket routed out. Easier than I thought, and scarier given my propensity to screw things up. What I have used as my guide thus far is the neck stub that I have been using to hang my bodies for spraying. It is the right size and shape, and, because I have been screwing it to the bodies before spraying, there is a Nitro "stain" mark on it. It may still be a touch shallow, but that can be fixed if it is wrong. It is easier to make it deeper than it is to make it shallower. One thing that I learned while doing this, entirely by chance and luck, is that a 1/4" straight router bit is the way to go for this part of the project. It will make the corner easily, which a bit that is too large won't do at all. One detail: The neck pocket should be 5/8" deep. The bit that I started with is 5/8" long (cutting depth) so I went down to Home Depot and got a bit that is 1" long. Perfection.
 This is the neck stub in the pocket. Looks like it actually fits perfectly.
As you will see, not quite, but pretty damn close.
This is the neck stub in the pocket. Looks like it actually fits perfectly.
As you will see, not quite, but pretty damn close.
 Close up of same.
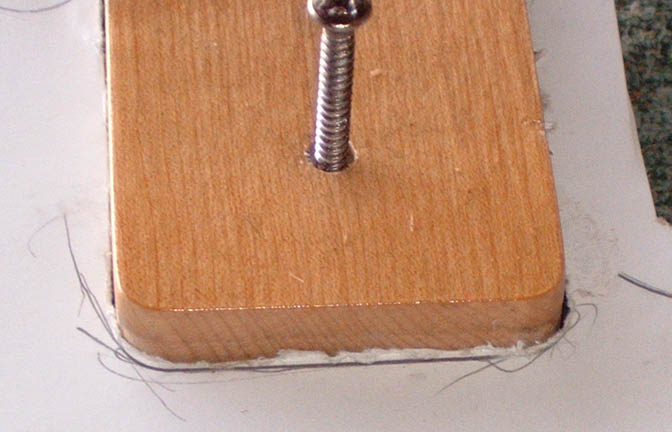 Now you can see some of the imperfection on the lower right side. The stub is
popped up a bit so that you can see the stain line.
Now you can see some of the imperfection on the lower right side. The stub is
popped up a bit so that you can see the stain line.
 And from the side view.
 A touch out of focus, but you can see that the stain line matches to the body now.
And the neck pocket, finished, from two different angles.
![]()

*********************************************************
17 Apr. 2003
OK, so I did the neck pocket correctly. Then I started on the outline of the body, and I started to have some challenges. The router bit took a hunk out of the body, and scared the stink out of me. so I did what any good cretin would do. I decided to get a body that I could use as a model to make templates from. These templates are made from 15/32" plywood. Good solid stuff. Expansion/contraction is the least of my worries. I also had the wrong type of router, so I had to get a new one of those. OK. And I got the proper bits to do this with.

It turns out that when I did the neck pocket, by some bizarre chance, I did NOT hose it up. How I don't know. The gods must have been smiling on me that day. Even the hunks taken out of the slab are outside the outline that I will end up with. I tried to take some pictures of the edge that is messed up, but the camera is having a challenge with it. I will continue to try.
 I also got my neck today. I have fallen in love with Rosewood necks that have
good grain and color. Ebony is too hard for me. And this Rosewood is pretty
danged hard. I just prefer the feel.
I also got my neck today. I have fallen in love with Rosewood necks that have
good grain and color. Ebony is too hard for me. And this Rosewood is pretty
danged hard. I just prefer the feel.
Oh well. Now that I have the templates made, I need to apply them to the body. Maybe tomorrow.
One note on the routing and template making that I did. Routing in general is messy. Lots of dust & stuff every where. Be prepared.
**********************************************************
18 Apr. 2003
So today I took out my templates that I made yesterday, and applied them to the body to see how I did, and I have some challenges. They are obvious in the photo's below. I also checked the depth of the neck pocket. My depth is correct. Somehow.
 Most of the gouges you see here are INSIDE the template body line. I am using
the neck pocket to define where the template goes, which in turn defines where the edges
of the body is. So, while I did route the neck properly by hand, it is having
consequences. What the end result will be I don't know. In the background you
can see my router. It is a Bosch non-plunge router. Brand new. Turns out
that the Ryobi I bought a while back is at best OK for this kind of work.
Most of the gouges you see here are INSIDE the template body line. I am using
the neck pocket to define where the template goes, which in turn defines where the edges
of the body is. So, while I did route the neck properly by hand, it is having
consequences. What the end result will be I don't know. In the background you
can see my router. It is a Bosch non-plunge router. Brand new. Turns out
that the Ryobi I bought a while back is at best OK for this kind of work.
 Close up of above.
 A smooth edge, done properly. Because of the edging tool, the body is a touch
wider than the template. So I can sand out some of the imperfections that the router
left.
A smooth edge, done properly. Because of the edging tool, the body is a touch
wider than the template. So I can sand out some of the imperfections that the router
left.
 These are saw marks, and again they are inside the edge of the template. Not
much, just a touch. They are from when I rough cut the slab. Again,
orientation to the neck pocket is the critical thing, and I just got too aggressive and
impatient. ARGH!
These are saw marks, and again they are inside the edge of the template. Not
much, just a touch. They are from when I rough cut the slab. Again,
orientation to the neck pocket is the critical thing, and I just got too aggressive and
impatient. ARGH!
 The amazing thing is that I did the neck pocket almost perfectly. By hand.
All that wood on the inside of the horn I actually took off with a saw. It
was faster and easier than routing it.
The amazing thing is that I did the neck pocket almost perfectly. By hand.
All that wood on the inside of the horn I actually took off with a saw. It
was faster and easier than routing it.
 Oops. The edge guide rode up on the template. This is the result.
 And this is the kind of mess that a router can make.
And the weight is now 5.5lbs. It started out life at 11.5lbs. I figure that I need to get about another 1-2lbs out of it. I don't think that I can, but routing for the rear controls will help a lot.
*********************************************************
23 Apr. 2003
Today I finished the neck pocket, in that I took out all of the excess wood around the neck mounting platform. Forgive me for making words up. I dont know all the technical phrases.
 This is what it looks like with the template still on it.
 If you look at the photos above, you can see the difference. Now it will hold
a neck.
If you look at the photos above, you can see the difference. Now it will hold
a neck.
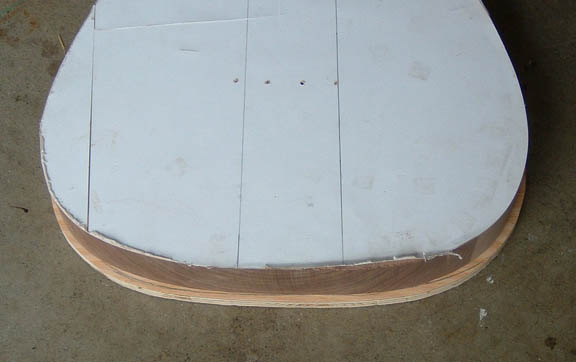
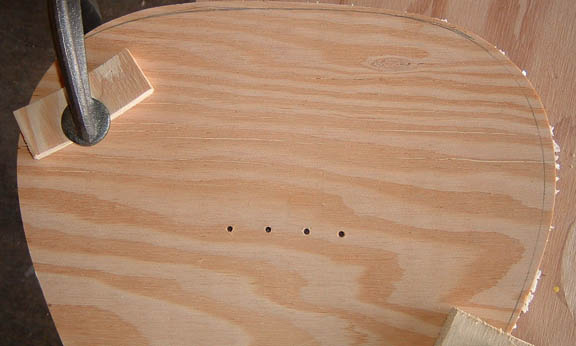 I drilled through the purchased body to mark the bridge line in my template.
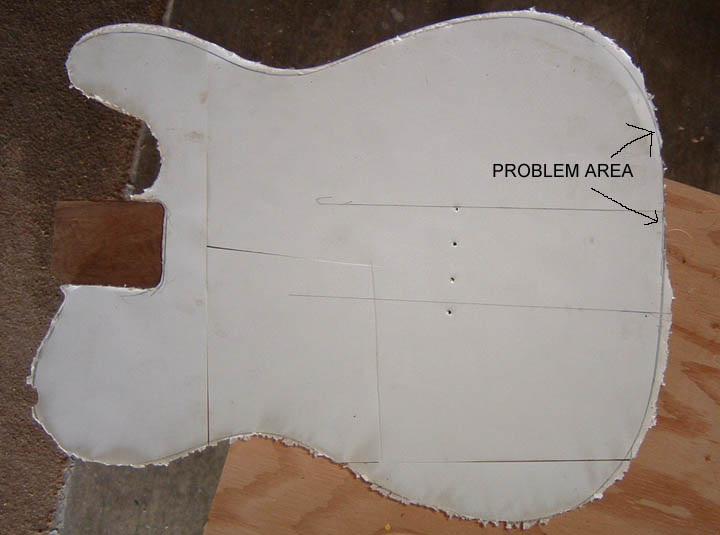 Now on the body you can see where the bridge line will go. It is not my
intent to put the bridge in that EXACT location using those holes. But now I know
pretty much where it should, and will, go.
Now on the body you can see where the bridge line will go. It is not my
intent to put the bridge in that EXACT location using those holes. But now I know
pretty much where it should, and will, go.
Other lessons learned. Impatience is my worst enemy. The saving grace is that I did not totally and completely hose up the neck pocket. I have some challenges, but they are manageable. But a bad neck pocket would have been disaster. So the way that I should have done this is: Make my templates. Cut out the body around the template for the back of the body. Do the routing for same. Having already drilled the bridge line holes in the templates, use them as register points and attach the template with the cutouts. Route. Finish the bad boy. And a great tool to have is a shop vac. I have been using one of my wifes hand vacs. But it is not big enough, and I think that I may have damaged it.
*********
One of my big anxieties has been where to put the PUPs. I have learned from playing my guitars that the amp setting is as important as the actual PUP when it comes to getting the type of sound that I don't want. Also, I have to figure that the people who designed the Les Paul & Telecaster and all the other great guitars know more than I do, and there is no reason for me to try and re-invent the wheel. So I won't. It will be a standard location for the bridge PUP. Nothing fancy there.
*********
Still Apr 23, but at the end of the day.
I took the body up to my buddy John, who all sorts of tools, and more wood working experience than I do. John actually gave me the slab of Walnut. I did it hoping that he could save my butt. He did.
 The body is actually about 3/8" too short. If you had nothing to measure
against you would not know. John did this freehand, too.
The body is actually about 3/8" too short. If you had nothing to measure
against you would not know. John did this freehand, too.
 So the next thing I decided to do is route the cavity for the controls, starting
with the cover that area. So I laid down a piece of paper, drew the outline, used a
Forstner to drill a hole deep enough for the cover, and not much more. And bigger
than the router bit I am using.
So the next thing I decided to do is route the cavity for the controls, starting
with the cover that area. So I laid down a piece of paper, drew the outline, used a
Forstner to drill a hole deep enough for the cover, and not much more. And bigger
than the router bit I am using.
 A little too big. I am not real concerned since it is on the back, but I wish
that I had done better.
A little too big. I am not real concerned since it is on the back, but I wish
that I had done better.
 With the cover off.
****************************************************
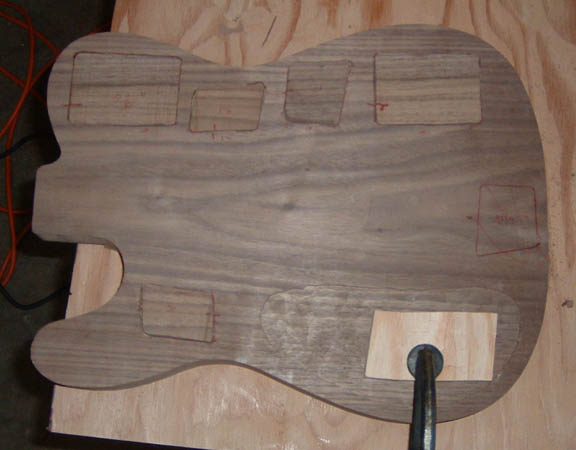
24 Apr, 2003
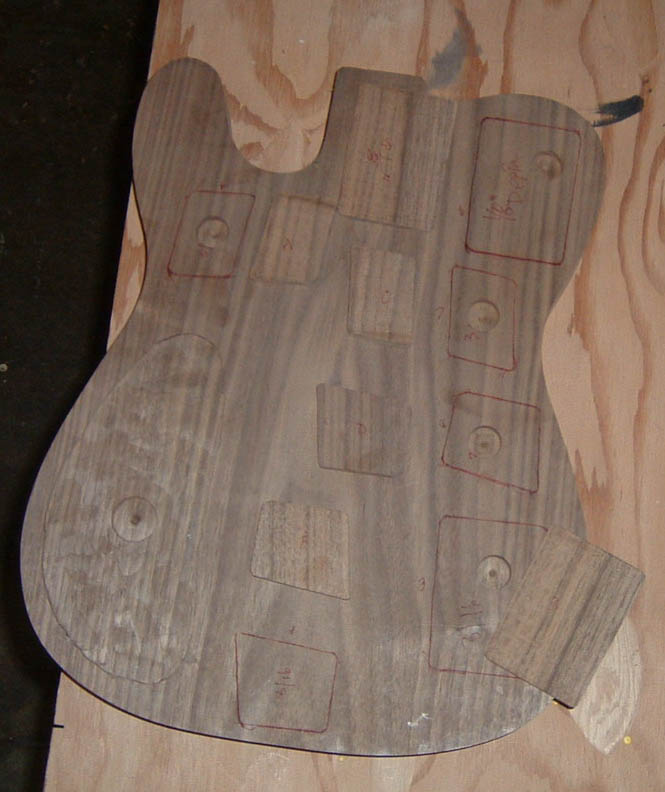 In order to lighten this critter, I am doing something unusual. I can not
just slice off the back and route out some chambers. This is one piece of wood, not
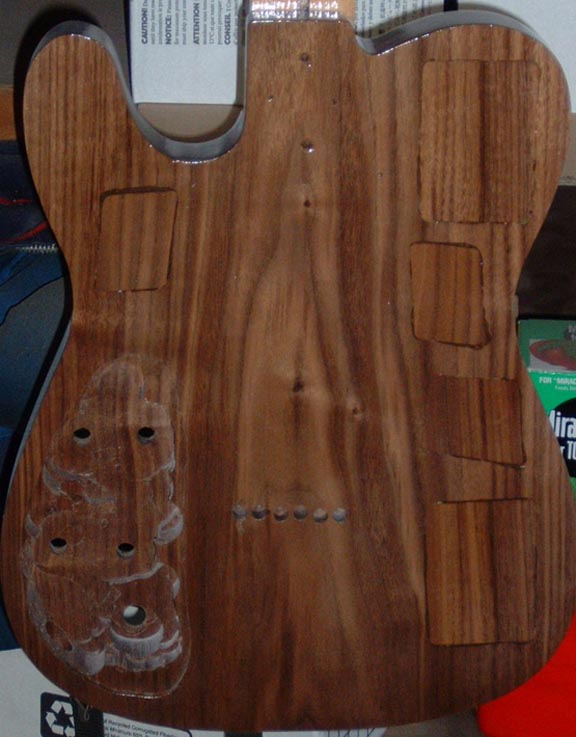
an underbody with a top. So, I have to dig out some chambers and put caps over them.
What you see here are where the chambers are going, outlined in red. I have
started with a hole in the middle of each, a bit shallower than the cap. My intent
is to sand the caps down to flush height. All of the odd bits of wood hanging around
are the caps. I did not use paper this time to draw on because I could not get the
grains lined up correctly. And finding the proper light was a bear and a half.
In order to lighten this critter, I am doing something unusual. I can not
just slice off the back and route out some chambers. This is one piece of wood, not
an underbody with a top. So, I have to dig out some chambers and put caps over them.
What you see here are where the chambers are going, outlined in red. I have
started with a hole in the middle of each, a bit shallower than the cap. My intent
is to sand the caps down to flush height. All of the odd bits of wood hanging around
are the caps. I did not use paper this time to draw on because I could not get the
grains lined up correctly. And finding the proper light was a bear and a half.
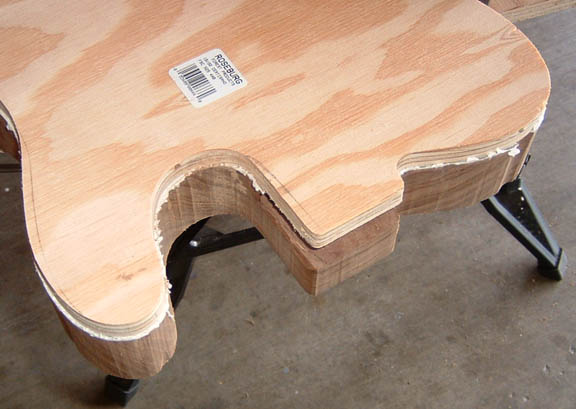
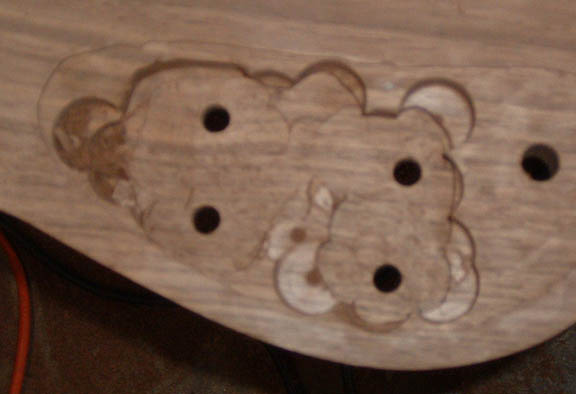
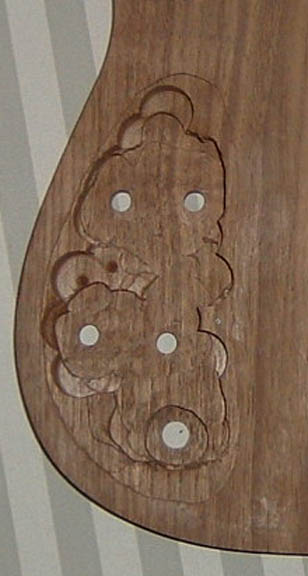
 All of the caps in their routed out holes. I decided not to do the space at
the butt of the guitar. Not sure why, but..... I didn't.
All of the caps in their routed out holes. I decided not to do the space at
the butt of the guitar. Not sure why, but..... I didn't.
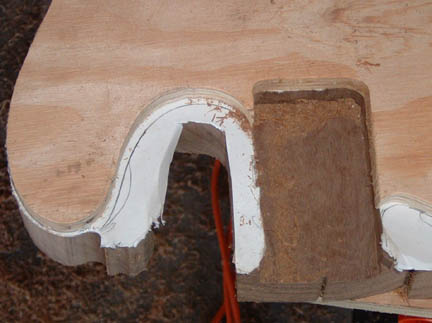
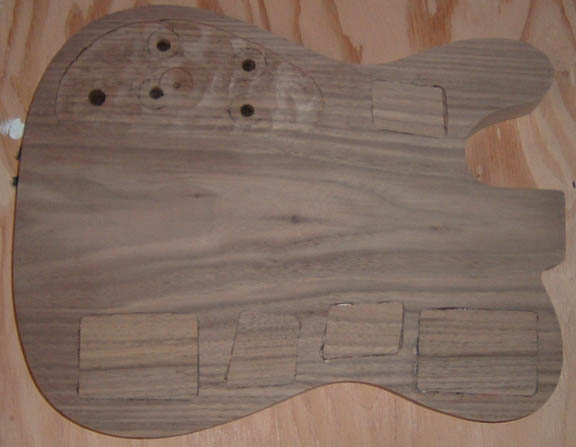
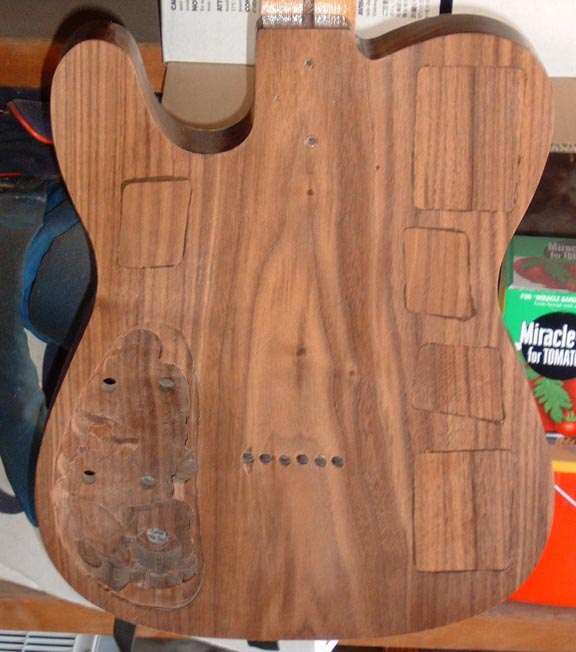
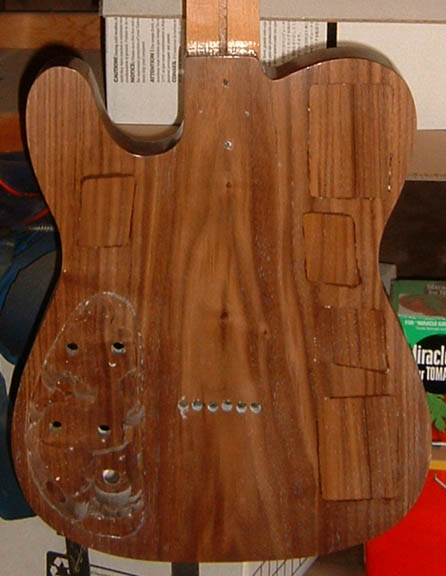
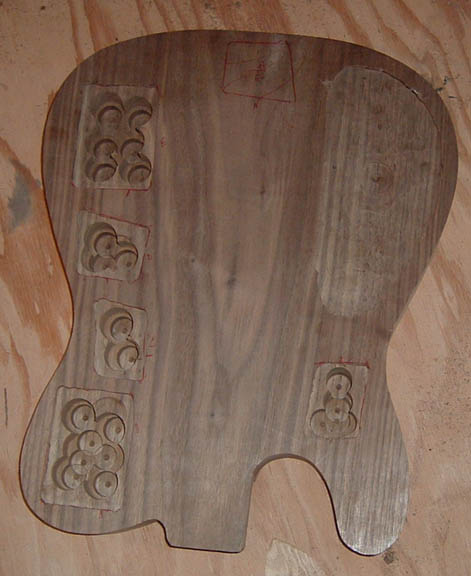 The whole body, with the holes and what not. I used a Forstner bit for this.
Actually two of them. I used the larger bit first for the 4 holes along the
top (left side), and did not drill deep enough. Then when I did the hole on the
bottom (right side) the large bit was too big for the space, so I used a smaller bit.
Which is when I discovered the holes were too shallow. So I re-adjusted and
went with it.
The whole body, with the holes and what not. I used a Forstner bit for this.
Actually two of them. I used the larger bit first for the 4 holes along the
top (left side), and did not drill deep enough. Then when I did the hole on the
bottom (right side) the large bit was too big for the space, so I used a smaller bit.
Which is when I discovered the holes were too shallow. So I re-adjusted and
went with it.
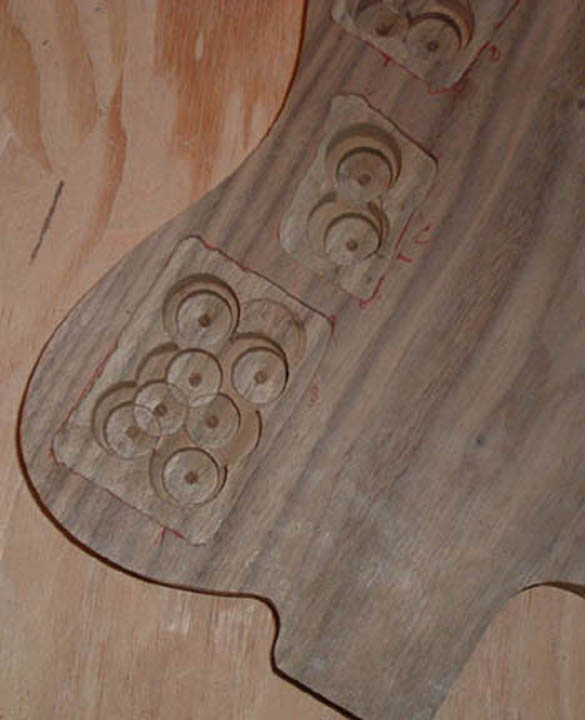 Close up of a few holes.
**************************************************
Today I sanded down the caps on the back of the guitar, and I routed out the control cavity. With one exception, everything is just hunky dory.
 Before any sanding is done. The red ink marks are the pen I used to
mark the edges and the alignment mark.
Before any sanding is done. The red ink marks are the pen I used to
mark the edges and the alignment mark.
 Part way thru the sanding process. I took a break, so I took a picture.
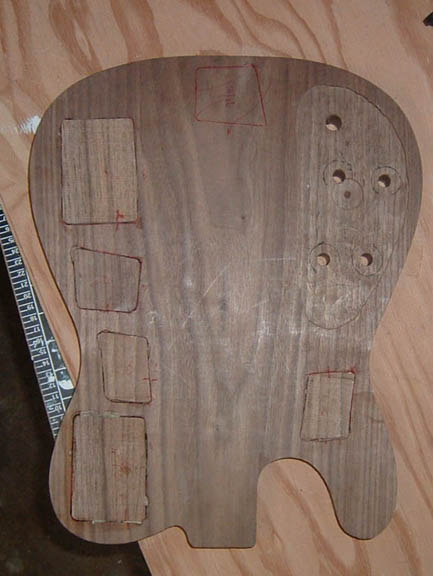
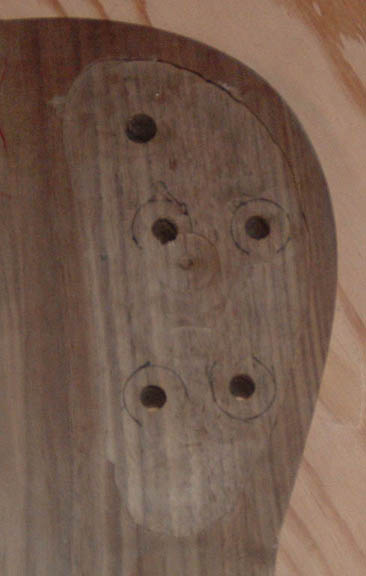
 All of the sanding is done. The holes for the pots and the switch are drilled
in the proper locations. Now I have to rout out the bits that I don't want.
One key here is that the cavity cover is from Warmoth and the holes are pre-drilled, in
fact they are counter sunk. Sweet!! So I marked the 4 hole locations.
All of the sanding is done. The holes for the pots and the switch are drilled
in the proper locations. Now I have to rout out the bits that I don't want.
One key here is that the cavity cover is from Warmoth and the holes are pre-drilled, in
fact they are counter sunk. Sweet!! So I marked the 4 hole locations.
 An out of focus look at where the pots go.
 The finished control cavity. There are 4 different layers of routing.
The highest layer is to support the cover. The next is to give me access to the top
of the pots. The third layer is where the pots will acutally mount. The last,
and deepest, is where the switch will mount to. This is pretty thin wood now, and I
hope not too thin.
The finished control cavity. There are 4 different layers of routing.
The highest layer is to support the cover. The next is to give me access to the top
of the pots. The third layer is where the pots will acutally mount. The last,
and deepest, is where the switch will mount to. This is pretty thin wood now, and I
hope not too thin.
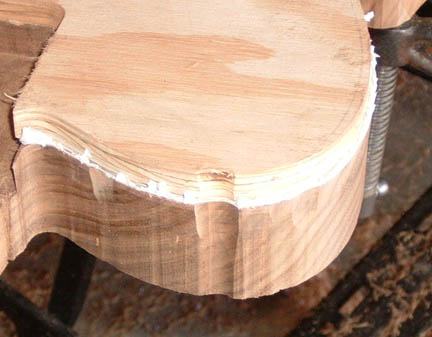
 The guitar body sanded down and routed and what not. The grain match is not
perfect, but then I did not expect it to be. But it is going in the proper
direction, and that I do care about.
The guitar body sanded down and routed and what not. The grain match is not
perfect, but then I did not expect it to be. But it is going in the proper
direction, and that I do care about.
The next step is the bridge and PUPs. The bridge is on order, and should be here next week. I hope.
After much tooing and froing, the final results are: Strat hard tail bridge, a HB in the standard BRIDGE position, and a P90 in the neck.
*****************************
May 2, 2003
 This is the back of the guitar. And my toes. What you see here is sawdust
filled epoxy that I am applying to fill the voids between the body and the caps.
After it dries it will get sanded down, and it should look fine.
This is the back of the guitar. And my toes. What you see here is sawdust
filled epoxy that I am applying to fill the voids between the body and the caps.
After it dries it will get sanded down, and it should look fine.
 This is the top of the guitar. At this point it just needs electronics and a
bridge, then final sanding.
This is the top of the guitar. At this point it just needs electronics and a
bridge, then final sanding.
One thing that I forgot to do, and have since done, is drill a hole for the jack. Oopss.... What good is an electric guitar with out a jack. That has been corrected.
P90 - 300k pots. HB - 500k pots
*********************************
And it weighs in at 5lbs.
May 22, 2003
Between my wife and I, we have managed to misplace the digital camera. So for the moment I have no pictures.
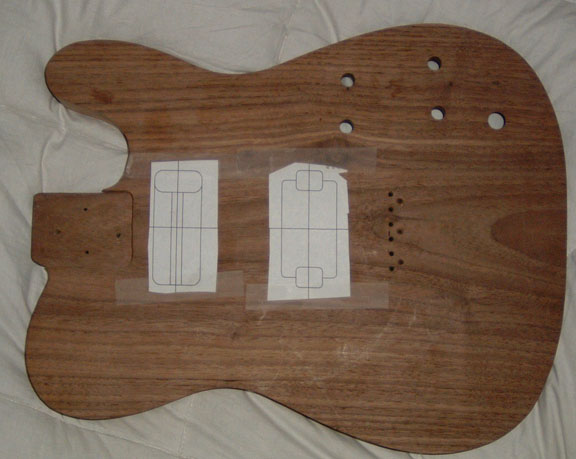
Today I decided to locate the bridge and at least the neck PUP. Because I doing things non-standard, this presents me with some challenges. That and the fact that I am a bit impatient. So, how to do this?
First, it is 26 inches from the nut to the string holes on a Tele. So, attach the neck and measure 26" from the nut to the line where the holes should go. Center the bridge over this line and screw the bridge down. Now you know where the string holes go, also. Drill those holes. You are done.
Locating the PUPs is a bit more challenging, because you have to get the PUP the proper distance between the end of the neck and the PUP. So I measured again, and guess what? The Tele FMT uses a different scale from a standard Tele. It is longer by about .35" from the nut to the end of the FMT fretboard. The other thing that you have to do is center the PUP. This is a bit of a challenge for me, since I did the neck pocket by hand, its dimensions are a bit off, and everything has to be centered on the neck. Since the bridge I am using, a hard tail Strat from AllPart, has 3 mounting screws and one of them is centered, I have one point. I marked the center point between strings 3 & 4 and there is my second point. I am using the drawing in the Hiscock book for my P90 template, it has a center line. So now I have that centered. Now I just need to tape it down, and drill & rout. And do the same thing for the bridge HB.
22 May cont.....
I found the camera by stepping on it. So here is a pic.
 The most obvious things are the locations of the PUPs, and the mounting holes and
string-thru holes. And if you look between the string-thru holes, you can see the
tick mark I used to locate the center line of the PUPs. Now all I need are my PUPs
and I can start routing.
The most obvious things are the locations of the PUPs, and the mounting holes and
string-thru holes. And if you look between the string-thru holes, you can see the
tick mark I used to locate the center line of the PUPs. Now all I need are my PUPs
and I can start routing.
***********************************
June 3, 2003
I have now routed/carved out the holes for the PUPs. A P90 at the neck, and a Gibson Burstbucker 2 (humbucker) for the bridge. The next step is sanding and other finishing steps.
I did this in a slightly goofy manner. I did what I thought was the entire the HB with the router. As you can see the outline is not very straight, but it does fit inside the outline of the HB bracket. And I did the outline of the P90, and then started in with the chisel. Turns out that I should not have used the router without a real template, which I don't have. The chisel works much better, it turns out. So now I know. And I should have done the holes in the back also that way. I got lucky with the neck pocket.
 Body, chisel, and mallet. A regular hammer will do the trick, but not real
well.
Body, chisel, and mallet. A regular hammer will do the trick, but not real
well.
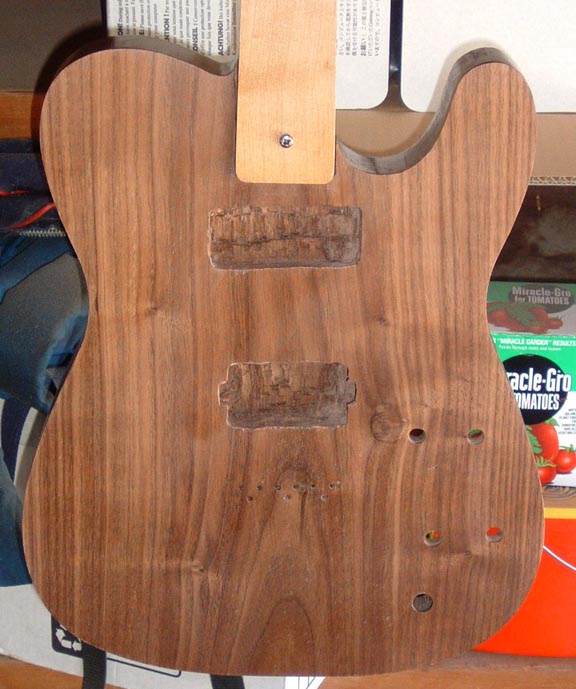
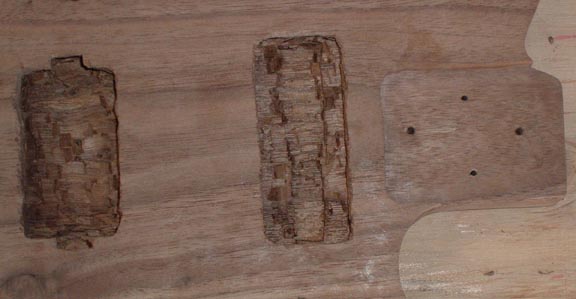 Close up of the PUP holes and the neck pocket. HB on the left, P90 on the
right. I am not going to finish the bottom of the pockets. I suppose I should
but I won't.
Close up of the PUP holes and the neck pocket. HB on the left, P90 on the
right. I am not going to finish the bottom of the pockets. I suppose I should
but I won't.
**************************************
June 4, 2003
I started spraying today. Photo's tomorrow, not enough time today. The first coat had a major run in it on the front, very visible. So I sanded that out and now you can not see it.
**************************************
June 5, 2003
 This is the back of the guitar, 2 thin coats of nitro, and 1 heavy coat of
grain/pore filler. Also, the edges are sharp, not rounded. Probably not the
smartest thing, but what the heck.
This is the back of the guitar, 2 thin coats of nitro, and 1 heavy coat of
grain/pore filler. Also, the edges are sharp, not rounded. Probably not the
smartest thing, but what the heck.
 And the front, same state of finish. Sanded down to 400 grit sand paper.
Tomorrow another thin layer of nitro. Then next week the final heavy coat of
nitro. Then 2 weeks later I get to put this puppy together. Yee-hah. And
play it.
And the front, same state of finish. Sanded down to 400 grit sand paper.
Tomorrow another thin layer of nitro. Then next week the final heavy coat of
nitro. Then 2 weeks later I get to put this puppy together. Yee-hah. And
play it.
***************************************
June 6, 2003
Well, I changed my mind. I did the final spraying today. It will be two weeks before I can final sand/polish it. And this is what it looks like now. It looks much richer, and wet, though it is dry to the touch. It has been fun and educational doing this project. Of course, I will be doing more. I think. We shall see.
As I have been working for the last few days, I have been listening to Johnny Cash, Son House, and Chester & Lester.
***************************************
June 16, 2003
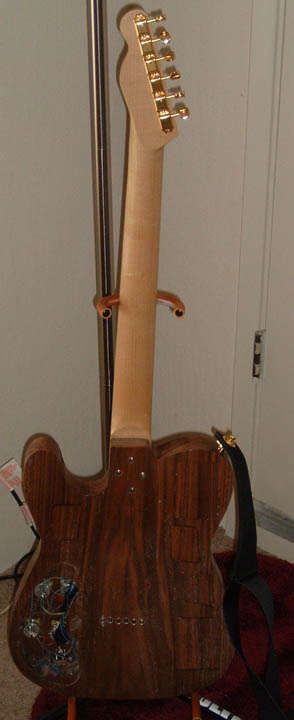
The body is done and polished. The gray area's on the front of the body are a camera artifact, thank god. I can not see them in real life.
I now need only a few parts to put this thing together: Jack & mounting plate, screws for the humbucker mounting ring, some extra wire for inside the control cavity, the top "washer" that goes on the switch that says rythym/treble. And being Monday my guy is closed today. And tomorrow, I think that I am going to buy a new amp, the Peavey 212 tube amp.
***************************************
June 23, 2003
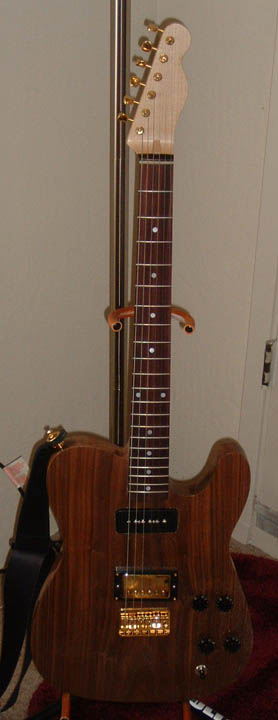
Well, it's done. Heave a sigh of relief. Two MINOR details, one I will likely skip. The one that I am planning to skip is the "washer" referred to above. The other is the black plastic cap for the cavity, which I have somewhere, but have lost. No big.
In real light, the wood is a bit lighter than in the picture. I had a choice between a touch dark or a bright splotch in the middle from the flash. Sounds good, plays well, I think. Not much time on it yet, but I will get there.
***************************************
June 25, 2003
I had some minor challenges with the electronics, trying to get the noise out of the PUPs. I finally did, but with a strange result: The knobs go in opposite directions. Goofy as hell, but the PUPs are quiet, so I am going to keep my hands OFF.
Oh, I did not get the Peavey amp mentioned above, Instead I got an all Koa acoustic from Tacoma. But the amp will come, in its time.
***************************************
November 12, 2003
A little bit ago, I realized that I had been building my guitars all wrong, in one respect. I had not been using the neck plate from Fender. So I started to put one on all my guitars, and I screwed it up the Walnut guitar. So now I get to fix the problem.
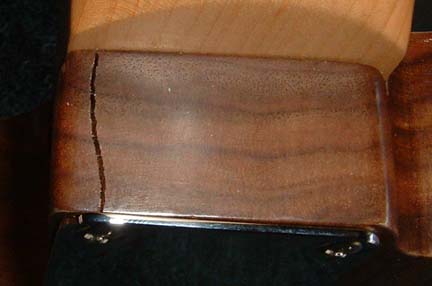 This is the neck pocket. You can see the crack. The goal is to get some
glue in there to fix that crack. But the crack is really very tight, and I am not
sure how I am going to do this. I may reinsert the screw and force it a bit and use
a tooth pick to force the glue in.
This is the neck pocket. You can see the crack. The goal is to get some
glue in there to fix that crack. But the crack is really very tight, and I am not
sure how I am going to do this. I may reinsert the screw and force it a bit and use
a tooth pick to force the glue in.
 The back side of the neck heel. I had planned to use a 1/4" dowel to
fill the holes, but the two holes at the bottom of the heel are too close to the edge, so
back to Home Depot for some 1/8" doweling.
The back side of the neck heel. I had planned to use a 1/4" dowel to
fill the holes, but the two holes at the bottom of the heel are too close to the edge, so
back to Home Depot for some 1/8" doweling.
 The back side of the neck pocket on the body, without the neck attached. The
crack is almost invisible now.
The back side of the neck pocket on the body, without the neck attached. The
crack is almost invisible now.
Welcome to the Guitar Ed School of What Not to Do
In order to open the crack enough to get the clue in there, I took a piece of 1/4" dowel and sharpened one end, then I forced it into the hole, using a wooden hammer. Then I used a toothpick to get the glue in the space. Then clamps.......
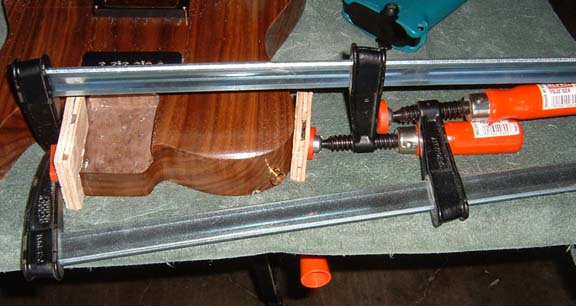 In order to get this gap to close up on the glue, I had to overlap the clamps at
one end. You can see it in the photo. But if I had not done this, it would not
have worked, and there is still no guarantee that it has worked.
In order to get this gap to close up on the glue, I had to overlap the clamps at
one end. You can see it in the photo. But if I had not done this, it would not
have worked, and there is still no guarantee that it has worked.
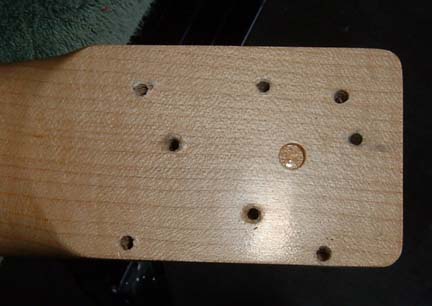
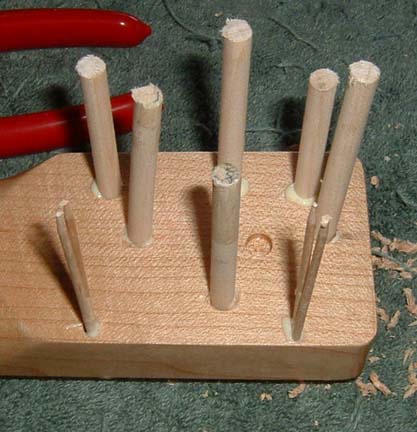 This is what the neck side looks like. In the two holes I used toothpicks
because the smallest dowel I could find is 1/4", and I can't drill a hole that size.
I would rip out the side of the neck. So......... With any luck, this
will work. If, it goes and so does the body. Argh.
This is what the neck side looks like. In the two holes I used toothpicks
because the smallest dowel I could find is 1/4", and I can't drill a hole that size.
I would rip out the side of the neck. So......... With any luck, this
will work. If, it goes and so does the body. Argh.
Please Email Me if you have any questions or comments