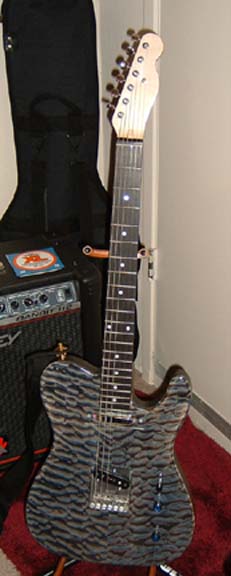
The Blue Guitar
I name my guitars after their color, at least for now. Lessons I have learned are
scattered about this page.
The details on this guitar are:
- Body from Warmoth. 5A quilted maple over ash. Thinline, no f-hole. Very
light weight. Rear routed. I tend to prefer rear routes, shows more of the
wood. Warmoth drilled the holes for the pots and switch. I found the body in
their "thrift shop" section. The only quilt top I found that I liked.
It looked very liquid, and I fell in love with it at first sight.
- The blue dye I mixed myself. I was trying to get what Gibson calls Peacock, but I
never did. It is a turquiose/teal like color. But I like this blue, particularly the way
the grain shows thru. The back is black, which I bought. They are both a water
based dye, which means you have to sand after applying the dye, since the water
"pops" the grain. You can use the sanding process to create a unique look.
If you don't want to deal with water based dyes, you can use alchohol based dyes.
LMII and StewMac both sell dyes. Mixing dyes can be time consuming because
you have to let the tints blend before you apply them. Also, knowing something about
color theory will be a big help. I don't, so I don't always get the colors I want,
and it takes me more time. Baby food jars are great for holding and mixing dyes.
- Neck by MusiKraft. 1/4 sawn maple with ebony fret board. They also put the frets
on for me. 1.75" wide at the nut, because I like a wide neck. Standard Tele
radiusing. Acrylic finish, not tinted. Double action truss rod, accessible
from the nut. Vintage is fine, but in my mind, ease of use and setup should take priority
over "the look".
- PUPs are the Kinman AVNs. I have not heard them yet, but they have a good reputation.
Also, they are easier to wire than most PUPs. A winner for ease of use.
- The bridge is a six brass-saddle vintage style piece. Unknown vintage, but old.
- Pots are 250k Ohm. Short shaft. Knobs vintage style.
- I am using high end strap locks and jack. It pisses me off when factories use
cheap stuff here. Your straps come off at inopportune moments, the jack does not
hold your cable tightly, so you get inconsistent, and bad, sound. The good stuff is
not expensive, so I use it.
- Tuners are Kluson vintage style.
- The nut is bone, from StewMac. This piece is fairly tough to do right. I have big
hands, and small hands are better for this operation. I have not started on this piece
yet, and when I do I will include photos is my camera will will work on something that
small. If you want ivory, try this guy.
I just found him and know nothing about him.
Some photos:
 If you go back to the yellow guitar and look at the edge of that guitar, you can
see how much better the dye job is. The reason is the way that Mahogony absorbs dye
vs. the way Ash absorbs dye. I am not sure how to handle this just yet. Also,
you can see how the black dye creeps up into the Maple, where I want blue
dye. Another issue here maybe that I did not mix the dye enough before application.
On the yellow guitar I taped the edge before applyig the black dye. Not so on
the blue guitar.
If you go back to the yellow guitar and look at the edge of that guitar, you can
see how much better the dye job is. The reason is the way that Mahogony absorbs dye
vs. the way Ash absorbs dye. I am not sure how to handle this just yet. Also,
you can see how the black dye creeps up into the Maple, where I want blue
dye. Another issue here maybe that I did not mix the dye enough before application.
On the yellow guitar I taped the edge before applyig the black dye. Not so on
the blue guitar.
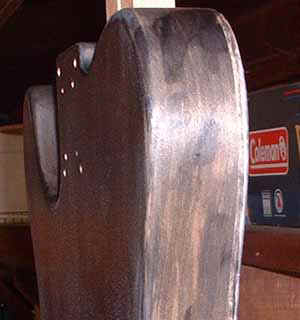
 The back of the neck.
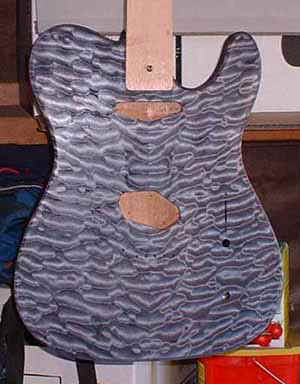 The body dyed and being sprayed with NitroCellulose from StewMac. Note the hanger.
That is actually the stub off a tele neck. Having the hanger makes spraying much
easier. And it keeps the nitro out of the neck pocket, thus preventing the need for
cleaning out the neck pocket later. The photo makes the body look a bit purple, but
in real life it is bluer.
The body dyed and being sprayed with NitroCellulose from StewMac. Note the hanger.
That is actually the stub off a tele neck. Having the hanger makes spraying much
easier. And it keeps the nitro out of the neck pocket, thus preventing the need for
cleaning out the neck pocket later. The photo makes the body look a bit purple, but
in real life it is bluer.
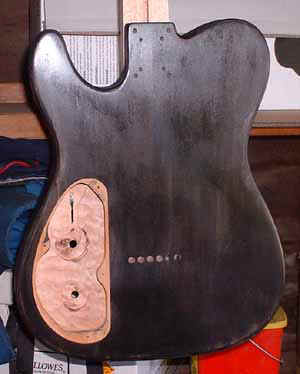
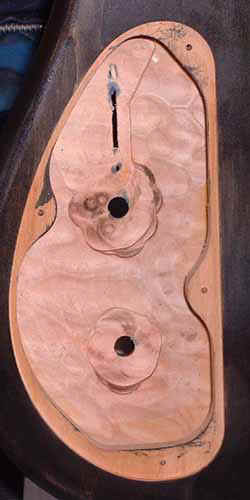 I am using a rear route option. Warmoth drilled the control holes, and routed out
the wood where the switch goes. But it is not thin enough for the short shaft pots
that I use, so I have to grind it down a bit. I used the flat top sander tool from
my Dremel tool and put it in a 12" drill press. The secret to getting a
consistent depth is to not put a lot of pressure on the drill press handle, and move the
body side to side slowly. For exposed wood, probably not a great way to do it, but
this is hidden and I don't want to buy a $300+ router just to do this little piece.
I am using a rear route option. Warmoth drilled the control holes, and routed out
the wood where the switch goes. But it is not thin enough for the short shaft pots
that I use, so I have to grind it down a bit. I used the flat top sander tool from
my Dremel tool and put it in a 12" drill press. The secret to getting a
consistent depth is to not put a lot of pressure on the drill press handle, and move the
body side to side slowly. For exposed wood, probably not a great way to do it, but
this is hidden and I don't want to buy a $300+ router just to do this little piece.
 The whole back, and nothing but the back. The thin spots in the dye are where I had
to sand out a few runs in the nitro from applying it to thickly. Also notice that I
have drilled the holes for the neck cover plate, as well as the neck screws.
Drilling these holes before applying the finish will save the drill bit from tearing up
the wood. Same with the strap locks.
The whole back, and nothing but the back. The thin spots in the dye are where I had
to sand out a few runs in the nitro from applying it to thickly. Also notice that I
have drilled the holes for the neck cover plate, as well as the neck screws.
Drilling these holes before applying the finish will save the drill bit from tearing up
the wood. Same with the strap locks.
To finish the body, I am using spray Nitro from StewMac. They suggest using a
well ventillated area, and they are right. My luthier does his guitars with one
light coat of nitro, and then one very heavy second coat sprayed over a whole day.
You have to be very careful, because nitro will run. To do a heavy coat, spray a
light mist, let it dry about 15-30 minutes, and spray another. If you have the
chance, you can do the last coat in one day. StewMac says 2-3 cans per body, Keith
says one can per body. I am not sure myself just yet.
I have chosen to do lots of thin layers, and then a heavy coat. I am in the middle of
the heavy coat at the moment.
********************************************
Nov 4, 2002
I have now started on the neck. I have two tasks to do: Install the tuners and
install the nut.
First is the tuners.
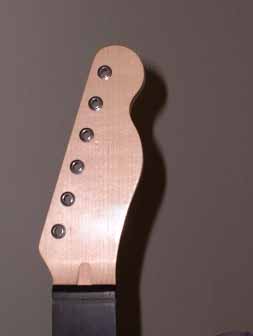 The
first step is to insert the machine guides. Since I buy my necks finished, the first
thing I do is use a bit of sandpaper to clear out the bit of finish that has gotten inside
the holes. I used 80 grit sandpaper this time. It took about 15 minutes. On
the yellow guitar I used 120 grit, and it took about 3 hours. Don't sand out too
much. You want a snug fit, not a sloppy fit. Then I used a hammer and piece of
wood to get the guides to seat. I worked from the nut towards the end of the
headstock. Be very careful doing this, so as not to damage the neck.
The
first step is to insert the machine guides. Since I buy my necks finished, the first
thing I do is use a bit of sandpaper to clear out the bit of finish that has gotten inside
the holes. I used 80 grit sandpaper this time. It took about 15 minutes. On
the yellow guitar I used 120 grit, and it took about 3 hours. Don't sand out too
much. You want a snug fit, not a sloppy fit. Then I used a hammer and piece of
wood to get the guides to seat. I worked from the nut towards the end of the
headstock. Be very careful doing this, so as not to damage the neck.
The next step is to actually install the tuners, then the nut.
*********************************************
Nov 26, 2002
I have finally sprayed enough nitro last week, and now it is drying. According to
both Stwemac and my luthier, a minimum of 2 weeks before polishing. Stewmac says to spray
lots of thin coats before drying and polishing, and to use 2-3 cans of nitro. My
luthier says to use 1 thin coat, the one thick coat, using a total of one can. I now
see his point. It is faster, and a bit less expensive, at $9.00/can. The way
you do a thick coat is this: Lots of thin coats, about 5-10 minutes apart. No sand
or anything between applications. But you have to let it dry a bit so that it does
not run. I did it in my garage, hung from the garage door. As the can says,
ventillation IS a must. If you breathe in any of the fumes, you will feel it.
*********************************************
Dec 3, 2002
I finally did the nut today. No real pictures to show here, as the camera does
not have the lense for close-up work that is needed. I got the nut from StewMac, and
I use bone. It is easy to work with and does not gum up sand paper. The nut
they ship is most likely too large, since they don't pre-cut them. I used 80 and 220
grit sand paper to sand the nut down, and my Dremel tool with a cutting blade to cut the
end off. There are two variables here you can play with: The height of the nut
(action) and the curvature on the back side. (I have no idea what this last comment
means. It was important when I first wrote it. Now?????) On the Yellow guitar, the
nut is a shred too short, on the Blue guitar, probably a bit tall. I might
make this a slide guitar.
You have be fairly careful shaping the nut. The bottom side has to stay square to
the sides. Also, you want a snug fit in the slot. There is no magic secret here,
other than being prepared to throw a few nuts away.
The next step are the tuners. I approach this with a bit of treppidation. I
am using Kluson tuners this time. They fit together very tightly, and if the first
one is angled wrong, it could throw everything off. On the Yellow guitar I used
Schaller Mini-Lockers, and they do not fit together so tightly, so there was a margin of
error.
*********************************************
Dec 11, 2002

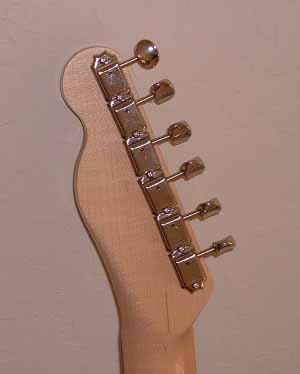 I put in the Kluson
style tuners yesterday. Not as bad as I had thought it would be. Actually much
easier that I expected. The key is to get the first one square: after that, since
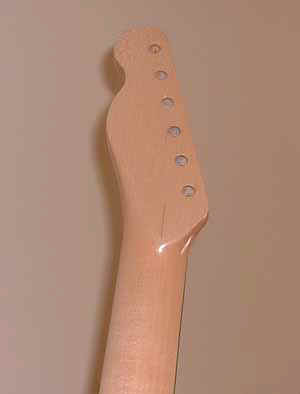
they all interlock, the rest will also be square. You can see in one of the photo's
above, the headstock with just the guides in. It now looks very different.
I put in the Kluson
style tuners yesterday. Not as bad as I had thought it would be. Actually much
easier that I expected. The key is to get the first one square: after that, since
they all interlock, the rest will also be square. You can see in one of the photo's
above, the headstock with just the guides in. It now looks very different.
All I need to do now is buff & polish the body, and then put it all together.
Then I can play it.
*********************************************
Jan 7, 2003
The New Year, and the next step in the process. Today I started the final sanding
process. StewMac sells a kit with six different grits of very fine sand paper,
two sheets each, that includes a sanding block. Just dip the sand paper in
water to dampen it, not flood the guitar, and start sanding/polishing. The water provides
both lubrication and thermal protection. As near as I can tell, when all the
scratches look the same size, it is time to move on to the next finer grit. About 5
minutes of sanding per grit. No pictures here, because my camera just ain't good
enough to show any detail.
The next step is the buffing and polishing, making the scratches even smaller and
finer.
I think that I made one FUBAR that is too late to recover from. I think that I
was supposed to use some wood grain filler on the Ash body before finishing. I
didn't and the back is starting to develop some pitting. Looks like crap, but does
not affect playability or tone. But I won't forget on Orange.
**********************************************
14 Jan, 2003 (early in the day)
Today I finished the sanding and the polishing. I got the finishing supplies thru
StewMac. The sandpaper is from a company called Micro Surface, and I have no idea who the
polishing compounds are from. One thing on the sandpaper: These guys have a
different approach to numbering the grit on their papers, and they have a chart somewhere
on their web page.
Anyways.... I used thru the finest grit of the sandpaper, and then used, in order, the
Medium, Fine, and Swirl Remover polishing compounds. I put the pad in my power drill
and used a low speed and light pressure. Worked very well. You can't tell from
photo's, but there are far fewer and smaller scratches. The only thing that happened
that I can not explain is that the finish is cracking a little bit around the holes to
mount the bridge to. Hmmmm.......
Later in the day
Well I cheated. I decided to put the PUPs in instead. Thought that I would get to
the pots and switch also, but ran out of time and light. And learned a lesson along
the way. What I learned is this: The PUPs in a Tele are supposed to mount to
something, like the pickguard or the bridge. Well, I don't use pickguards on my
guitars that I build, because Idon't like the way they look and ruin the look of a good
wood. So I mounted the neck PUP to the guitar it self, and the bridge PUP to the
mounting plate. But I had to figure that one out. Took me a while of trying to
mount it to the body directly to catch the clue. The bridge that I am using on this
is the 6-saddle piece from StewMac.
***********************************************
15 Jan 03.
Minor set back today. I cut the grooves in the nut too close together. The
spacing, on my Taylor, is 3/64" from the edge of the nut to the first string, then
21/64" between strings. I cut 11/64". Oh well. I will do it
next week. The total is 212/64". The end result is that I am off by
1/64". I can live with that.
***********************************************
The next phase is to finish the nut, and then put it all together.
11 Feb 03
Today I got the mounting piece for the bridge PUP. Just what I asked for, and at
the right price: FREE. (Thanks to Matt Ellis and his machine shop) The only
challenge was that the holes for the PUP were a little too wide, but I drilled out what I
needed to. Only to discover that I do not have the screws I need to hold this thing
together. Oh well. I will make my second Home Depot trip of the day tonight,
after I pick up my daughter.
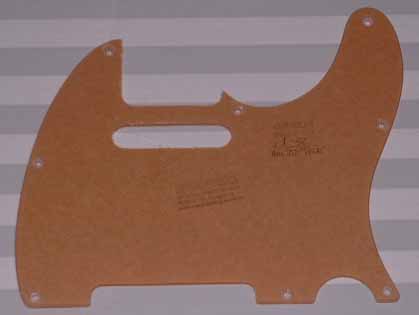 This is a standard pickguard.

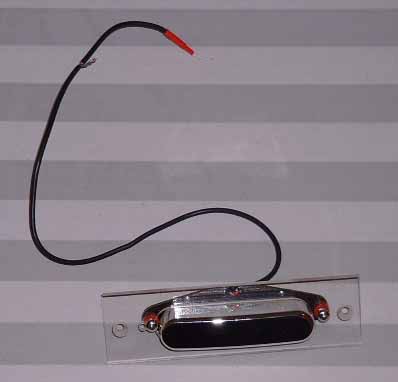
The picture on the left is what my friend made for me, the picture on the right is the
PUP (Kinman AVN) mounted in the bracket. You can see the extra hole in the mounting
piece. Not too bad, seeing as how I did not pay for it. But this leads to an
interesting question: Can I build a telecaster using tune-a-matic and build a mounting
piece of similar design for the bridge PUP? If so, then I could use a rolling bridge and a
Bigsby. Hmmmm.......
Then it should come together pretty fast. One thing that I have learned is that
if I have all the pieces on hand, I can stain, finish, fit, and complete a guitar in 2
weeks, including 1 week of letting the finish dry before buffing it out. But getting
all the pieces lined up is a bi*&ch.
I did not touch the nut today. Tomorrow if I get the rest of it together.
************************************************
12 Feb, 03
A major leap forward!! Yea!
I got the pickguard in, and all of the electronics attached, and the neck on.
YeeHah! Not with out trouble, but no major problems.
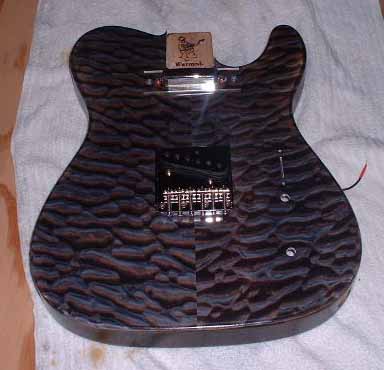 Just the guitar with the bridge PUP mounted in place. I love the reddish tones in
the wood, but only at certain angles, and only in the photo.
Just the guitar with the bridge PUP mounted in place. I love the reddish tones in
the wood, but only at certain angles, and only in the photo.
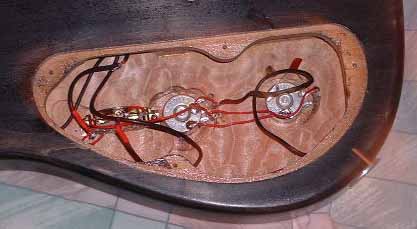 The control cavity, with the "stuff" in it.
 Pots, switch, and PUPs mounted where they belong. I almost did not route out enough
of the control cavity for the pots, as I almost forgot to account for the Nitro lacquer
depth. But barely.....
Pots, switch, and PUPs mounted where they belong. I almost did not route out enough
of the control cavity for the pots, as I almost forgot to account for the Nitro lacquer
depth. But barely.....
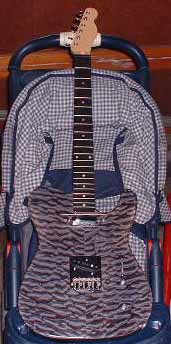 Guitar with neck. No strings or nut. Next week. Sitting in the baby
stroller. Great place for it.
Guitar with neck. No strings or nut. Next week. Sitting in the baby
stroller. Great place for it.
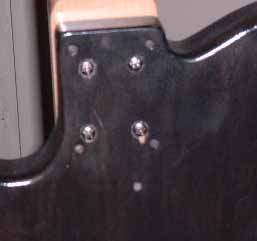 I made one boo-boo. When I went to do up one of the neck screws, I had the drill on
Reverse, not Forward. So when I went zap, the drill jumped and landed on the body,
doing the damage you see here, bottom center. Oh well. Its a relic mark!
I learned something else. I have a Makita battery powered drill, and setting
#3 for the gear is the right way to go.
I made one boo-boo. When I went to do up one of the neck screws, I had the drill on
Reverse, not Forward. So when I went zap, the drill jumped and landed on the body,
doing the damage you see here, bottom center. Oh well. Its a relic mark!
I learned something else. I have a Makita battery powered drill, and setting
#3 for the gear is the right way to go.
******************************************************
19 Feb 03
Well, I got the nut finished, the strings on, and........ NOTHING!
Argh!!!!!!! The guitar is in the shop awaiting an expert who knows what they are
doing.
I cut the slots in the nut wrong. I went over the math many times, and then
realized that 1/4" spacing * 7 = 1/75". But that is wrong. The two
end strings should be much closer to the edge of the nut/fret board than 1/4".
So that nut went in the trash, and I did another one. My luthier has a plastic
template showing how to space the strings, supposedly from StewMac. This is a much
easier way to do things, even though the PUPs still don't work. Intuition leads me
to believe that it is something simple, since they are Kinman PUPs and I followed the
directions correctly (I think), but obviously I did not.
If anybody knows where I might find the nut slot template refered to above, I would
appreciate it. I have tried StewMac and LMII with no luck.
*******************************************************
28 Feb 03
On the nut groove guide, I found it at Schatten
Designs. It should be on its way.
The big news is: The Blue Guitar has strings on it. And it sounds pretty nice. I
did something really wrong on the electronics, plus I forgot to put in a bridge ground,
like I was aware of this? It turns out that when you rear rout, you need a bridge
ground, and you need to ground the switch. Now I understand.
 I apologize for the pictures. Neither is very good. So what do I have
left to do? The knobs and switch doo-hickey. I also need to swap out the bridge.
Apparently it is a cheap Asian one that is not very good. I do have a Fender
bridge, and I will put that on. But it plays.
I apologize for the pictures. Neither is very good. So what do I have
left to do? The knobs and switch doo-hickey. I also need to swap out the bridge.
Apparently it is a cheap Asian one that is not very good. I do have a Fender
bridge, and I will put that on. But it plays.
*******************************************************
4 Mar 03
I did it. And I did not screw anything up. Miracle of miracles. I
swapped out the bridge for a vintage Tele bridge. Went well. Then I added
knobs and the swtich tip. And it works. The bridge was so bad that I had to
take a pair of cutters and cut the screws holding the saddles. Very sad.
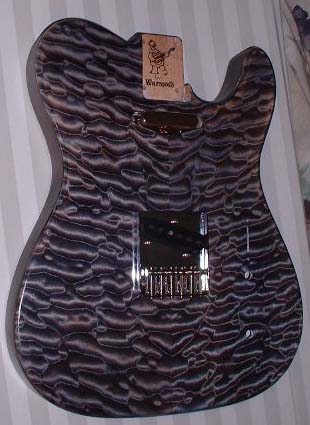
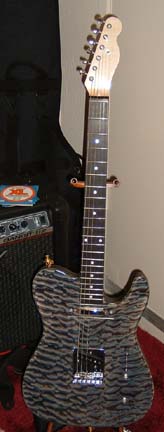
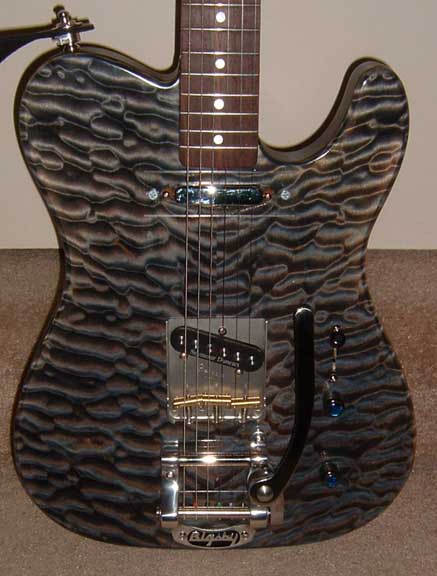
 The whole guitar, and nothing but.
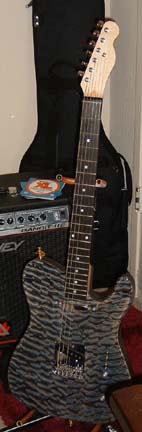
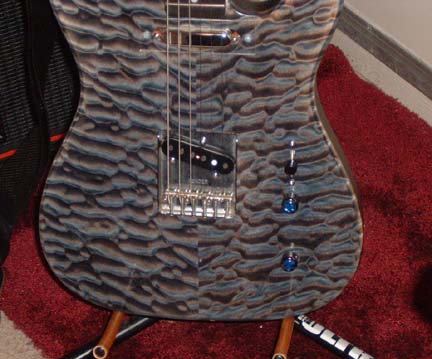 A close up of the body. You can sort of tell that then knobs are blue topped.
The shop did not have any that went up to 11, so I went with blue. Now it is done,
and just needs to be played.
A close up of the body. You can sort of tell that then knobs are blue topped.
The shop did not have any that went up to 11, so I went with blue. Now it is done,
and just needs to be played.
Next is to finish the Orange Guitar, then the Walnut Guitar, and the Resonator guitars.
Then... Who knows?
*******************************************************
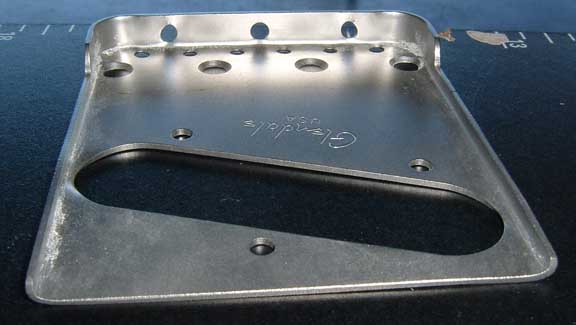
4 Oct, 2005
This is the beginning of the mods to Blue. They are:
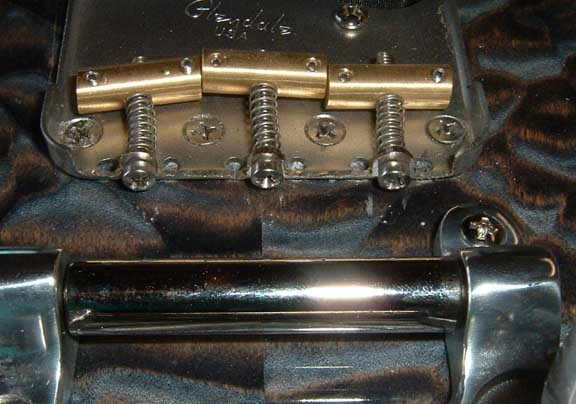
- Change the bridge from the 6 saddle Fender bridge to a 3 saddle Glendale bridge.
- Cut out the back of the Glendale bridge so that I can mount a Bigsby behind it.
- Change the PUPs from the Kinmans to, probably, Seymour Quarter Pounders, with coil
tapping
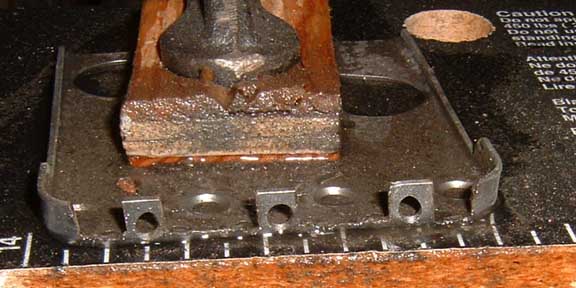
So the first thing that I have to present is the cutting up of the Glendale bridge.
This is what it looked like before I messed with it.
Here is my work space. Why the water? Cutting metal generates heat, and I
wanted a way to cool the bridge down.
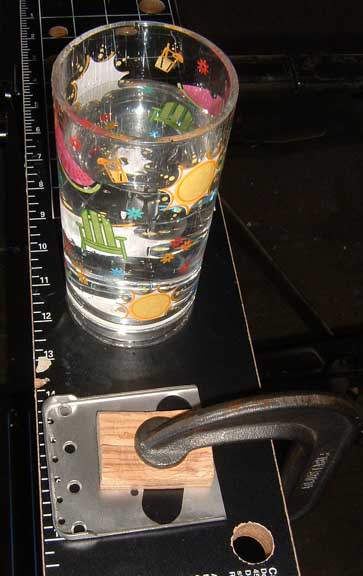
I did this using a Dremel tool. I used a cutting disk and cut through the metal.
One thing: You will need at least 2 disks as they are not very robust and the disks
wear rapidly.

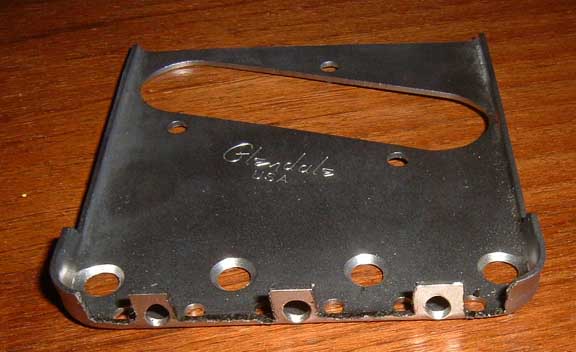
All the stuff cut away that I wanted removed, before cleaning.
And all cleaned up. I am not a metal worker, so the job is probably not as clean
as it should be. But.... I do what I can.
*******************************************************
7 Oct., 2005
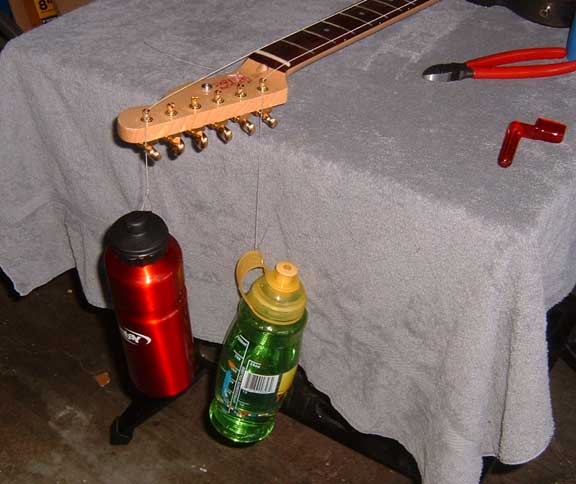
Today I received, and mounted, the Bigsby. Finally. Here are the pix.
The first thing you need to do is get the tail piece lined up to the neck. So
what I did was put some strings on the guitar, and then I weighted them down with water
bottles. It provided enough weight, but was light enough that I could still manage
everything.
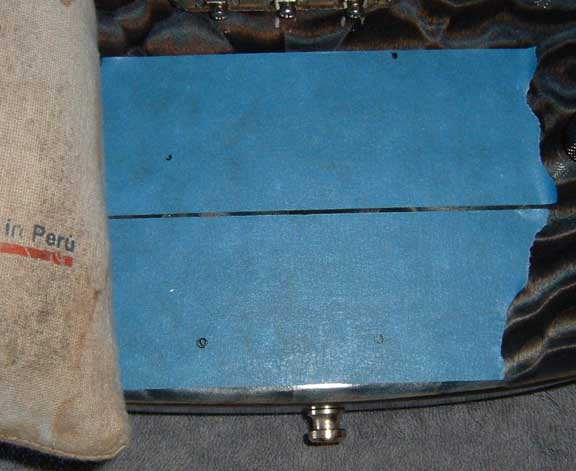
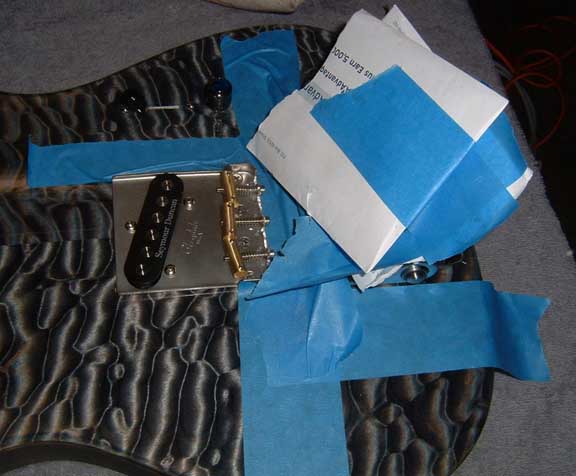
I used blue 3M painter tape to protect my finish, and I marked my drill spots. I
drilled the holes and screwed down the Bigsby. Before removing the tape. No
harm done. I did learn one thing that I had probably forgotten. When Warmoth
does a semi-hollow, the end of the guitar is hollow too, not just the sides. Fortunately,
there is enough wood to grab on.
I had to grind away a bit more of the bridge. It needs to be much closer to the
size & shape of the screw head than I originally had it. Since I did not want to
remove and unwire the bridge, I did the work with the bridge still on the body. To
protect the body from hot metal, I taped and papered over the thing like you see in an
operating room.
After the additional grinding.
All done and strung up, ready to play again. I need to set the saddle heights and
re-intonate, but that is pretty simple.
Lessons I learned:
- Tape the fine top before applying black stain to the back of the guitar. Also,
black will cover almost any color. The inverse is NOT true.
- Jimi Hendrix does GREAT covers of Bob Dylan tunes. As I am doing this I am
listening to Jimi from the Monterey Pops doing "Like a Rolling Stone".
Please Email Me if you have any
questions or comments